
How to Install Access Gates
Installation instructions for DIY homeowners and contractors on the Benner Deer Fence Co. Professional System installation method for installing deer fence access gates.
Install hinging gate post and hardware
Install reverse sleeve for hinging gate post: Follow previous instructions for reverse sleeve installation.
Install gate post: Slide gate post over reverse sleeve. Sink gate post 12” - 18” into the ground to achieve desired height.
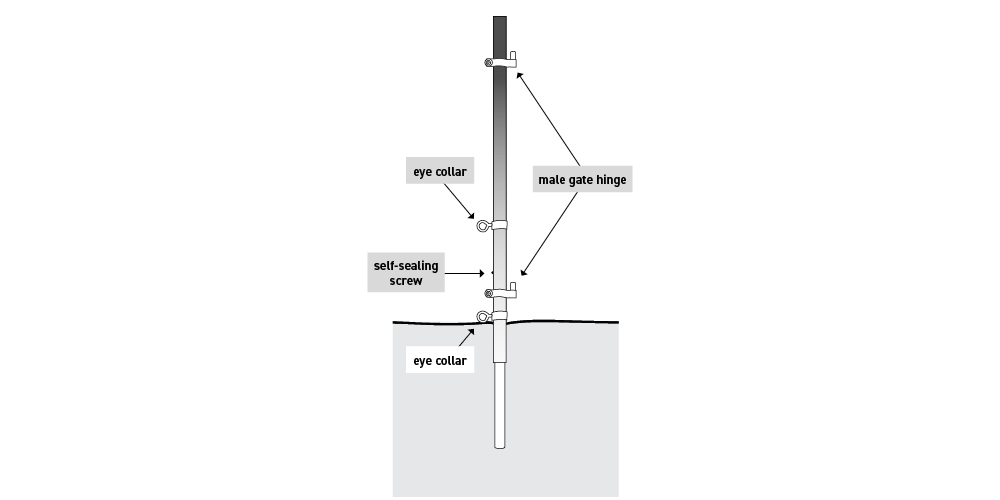
Install Bottom Hinge: Slide 1 5/8 inch male gate hinge onto gatepost and let slip to bottom.
Anchor Post: Anchor post to reverse sleeve to prevent the post from lifting up when tension is applied as well as prevents shifting when operating gate. Pilot a hole 12 inches up the post using an 11/64 inch drill bit (18V drill recommended) to pilot out a hole through the post and reverse sleeve. Fasten with a self sealing screw (use a drill/driver with a hex drive).
Install Eye Collar: Necessary if using a middle horizontal tension cable.Necessary if using a middle horizontal tension cable.
Install Top Hinge: Slide the other 1 5/8 inch male hinge onto the gatepost.
Tighten Hinges: Tighten the bottom male hinge facing in (where the gate will be in the closed position) at approximately 8 inches off ground. Tighten the top male hinge approximately 18 inches from the top of gate post, in-line with the bottom gate hinge.

INSTALL BRACE BANDS, BRACE CUP AND BRACE PIPE
Slide the 1 5/8 inch brace band with 1 5/8 inch brace cup and hardware onto the gatepost. Approximately 5 inches from top of post, semi-firmly tighten brace band. Brace cup needs to face down the fence line.
Insert the 1 5/8” brace pipe into brace cup.
The brace pipe needs to rest at approximately 45-degree angle to the ground by the next line post location.
Pilot the posthole for the next post approximately 2 inches away from where the brace pipe rests on the ground. Keep the gatepost in a level position.
Insert the reverse sleeve into the pilot hole and drive it about 3 feet into the ground in a level position.
Slide the 1 3/8 inch brace band onto the reverse sleeve. Keep the eyebolt facing in and the brace cup facing the brace pipe. Slide brace band to ground.
Insert the brace pipe into the brace cup and begin to tighten. Keep the eyebolt vertical and check for levelness of gatepost. Check post for levelness after tightening. Use 9-inch magnetic level.
Slide line post onto reverse sleeve. Install collar with eyebolt and post cap.
If tension/angle adjustment is required: use the up and down play of the 1 5/8 inch brace band at the top of gatepost.
· UP: Moves the post towards the next line post.
· DOWN: Moves the post away from the next line post.
BUILD GATE FRAME
Before completely tightening screws, measure diagonally from corner to corner– and opposite corner to corner of gate frame; measurements need to be equal.
Install female hinges before mounting.
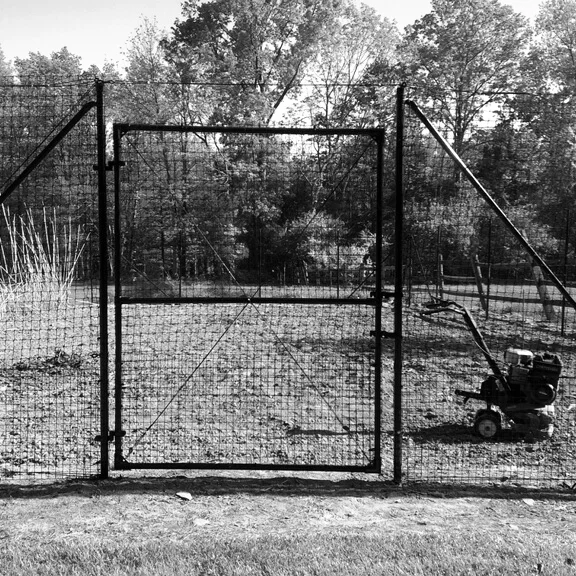
MOUNT GATE FRAME
Hold gate frame in a level position so the female hinges are on the same side as male hinges. Slide female hinges onto male hinges. Keep gate approximately 3-4 inches off the ground– rest gate frame on a piece of wood or rock.
Keep the gate frame level, tighten female hinges.
At this point it is important to keep gate closed and on leveling block or rock. Do not swing gate until tension is added to mounting post.
Position latch just above middle section of gate and tighten. Keep latch in the closed position, facing straight down the fence line away from gate. When using two latches, position latches about one foot apart.
INSTALL LATCH GATEPOST
With gate closed and level, use the san angelo digging bar to determine latch post location. Slide digging bar through gate latch vertically to mark spot. Make sure digging bar is located in the center of the latch, error on the side towards gate.
Pilot hole and install reverse sleeve. Slide a 1 3/8” brace band onto the reverse sleeve. Keep eyebolt facing down the fence line and tighten.
Slide latch gatepost onto the reverse sleeve. Check for levelness and that the gate latch fits.
ANCHOR POST: Anchor post to reverse sleeve to prevent the post from lifting up when tension is applied as well to prevent shifting when operating gate.
Approximately one foot up the post use the 11/64 inch drill bit (18V drill recommended) to pilot out a hole through the post and reverse sleeve.
Fasten with a self sealing screw (use a drill/driver with a hex drive).
BUILD GATE DOORWAY USING TOP SPREADER BAR
Keep gate-leveling block in place until the top fence cables have been installed and tightened.
Slide 1–1 5/8 inch gate corner onto the spreader bar. Keep gate corner in the middle of spreader bar.
(Small stepladder is recommended for next step)
Slide the gate corner onto the gatepost. Keep the gate corner in the middle of the spreader bar. (This will keep gatepost level)
Pull the top spreader bar out until is flush with the second gate post end.
Slide the other gate corner onto the top of latching gatepost. Hold gate corner in place.
Keep spreader bar length even with both ends of gate corner. Make sure it isn’t sticking out on either end.
Check levelness of top spreader bar and gateposts.
In the provided holes in the gate corners, drill pilot holes into the gateposts.
Install and tighten self-sealing screws into gatepost. Repeat process on other side of gate corners.
Re-check levelness of top spreader bar and gateposts.
While holding top spreader bar in place, drill pilot holes through provided holes in gate corners into spreader bar.
Install and tighten self-sealing screws into spreader bar.
PROFESSIONAL DEER FENCE TIP Keep leveling block in place until line posts, cables and fence are installed.